
How to Add Perfect Photo Captions to Your Airbnb Listing (Free AI Tool!)
Welcome to your ultimate guide on Airbnb Hosting Tips! In this post, we will explore a game-changing method to enhance your Airbnb listing by adding captivating captions to your photos. If you want your property to stand out and attract more guests, this is the place to start. Let’s dive in! Table of Contents Step 1: Access Your Airbnb Listing Step 2: Open Your Photos Step 3: Generate Captions Step 4: Paste the Caption Step 5: Repeat for Each Photo Step 6: Explore More Examples Step 7: Setting Up the AI Tool Step 8: Configure the Extension Step 9: Save Your Changes Step 10: Generate Captions Anytime Why Use Captions? Conclusion Frequently Asked Questions (FAQs) Step 1: Access Your Airbnb Listing To begin, log into your Airbnb account from your computer. Make sure to switch to the hosting mode, which will allow you to edit your listing. Once you’re in the hosting section, navigate to your listing editor. This is where all the magic happens! Step 2: Open Your Photos After reaching the listing editor, locate the section that allows you to view all your photos. Click on the “All Photos” option to see the images you have uploaded. This step is crucial because you will be adding captions to each of these images individually. Step 3: Generate Captions Now that you have your photos open, it’s time to generate captions. For each image, right-click and choose the option that appears to generate a caption. This AI tool will automatically create a caption that highlights the key features of the space, making your listing more appealing. Step 4: Paste the Caption Once you have the caption generated, it will be copied to your clipboard. Head over to the description section of your listing and paste the text there. For example, you might see something like: “Relax in the stylish living room featuring a cozy gray sofa, smart TV, and plenty of natural light.” This not only adds character to your listing but also enhances the storytelling aspect of your property. Step 5: Repeat for Each Photo Continue this process for each image in your listing. Each caption should be tailored to highlight the unique aspects of that specific space. For instance, if you’re working on the workspace photo, you might generate a caption like: “Productive workspace with natural light, a dedicated home office plus cozy seating.” This method not only saves you time but also ensures that your captions are professional and engaging. Step 6: Explore More Examples Before we move on to the setup instructions, let’s go through one more example. Click on the kitchen photo and repeat the right-click process. The AI tool will read the image and generate an appropriate caption. Once it’s done, simply paste it into the description section. Step 7: Setting Up the AI Tool To access the right-click caption generation feature, you need to sign up for a free trial at the specified website. I will provide a link in the description below. Once you sign up, you will be prompted to install a Chrome extension. Step 8: Configure the Extension After installing the extension, navigate to your account settings. You’ll find an option for “Alt Text Generation.” In the advanced section, you need to copy and paste a specific text that I will also include in the description. This text will help the AI generate better captions for your images. Step 9: Save Your Changes Once you have pasted the necessary text into the alt text generation section, click on “Save.” This will ensure that the AI tool is configured correctly and ready to generate captions for you. Step 10: Generate Captions Anytime Now, whenever you want to add a caption to any image in your browser, all you need to do is right-click, choose the option, and voilà! An amazing photo caption will be generated for you. Why Use Captions? Adding captions to your Airbnb photos is not just about aesthetics; it has several practical benefits: Improved Guest Trust: Guests are more likely to book a property that provides clear and detailed descriptions. Accessibility: Captions help guests with visual impairments understand the space better. SEO Benefits: Well-written captions can improve your listing’s visibility on Airbnb’s algorithm. Conclusion In conclusion, adding captions to your Airbnb photos is a simple yet effective way to enhance your listing. By following these steps, you can create a more engaging and informative experience for potential guests. Remember to leverage the free tools available to make the process easier and more efficient. Give this method a try, and watch as your property gains more attention and bookings. Thank you for reading, and if you found this guide useful, please consider sharing it with other Airbnb hosts! Frequently Asked Questions (FAQs) 1. Do I need to pay for the AI tool? No, the tool offers a free trial which you can use to generate captions for your Airbnb photos. 2. Can I customize the captions generated by the AI? Yes, you can edit the captions after they are generated to better fit your style or preferences. 3. How long does it take to set up the AI tool? The setup process is quick and should take no more than 10-15 minutes. 4. Will adding captions really make a difference? Absolutely! Captions enhance the visual storytelling of your listing, making it more appealing to potential guests. 5. Is this method suitable for all types of listings? Yes, whether you have a cozy apartment or a spacious villa, adding captions can benefit all types of Airbnb listings. For more tips and tricks on Airbnb hosting, stay tuned for our upcoming articles!
How to Add or Delete Rooms in Your Airbnb Listing: A Comprehensive Guide

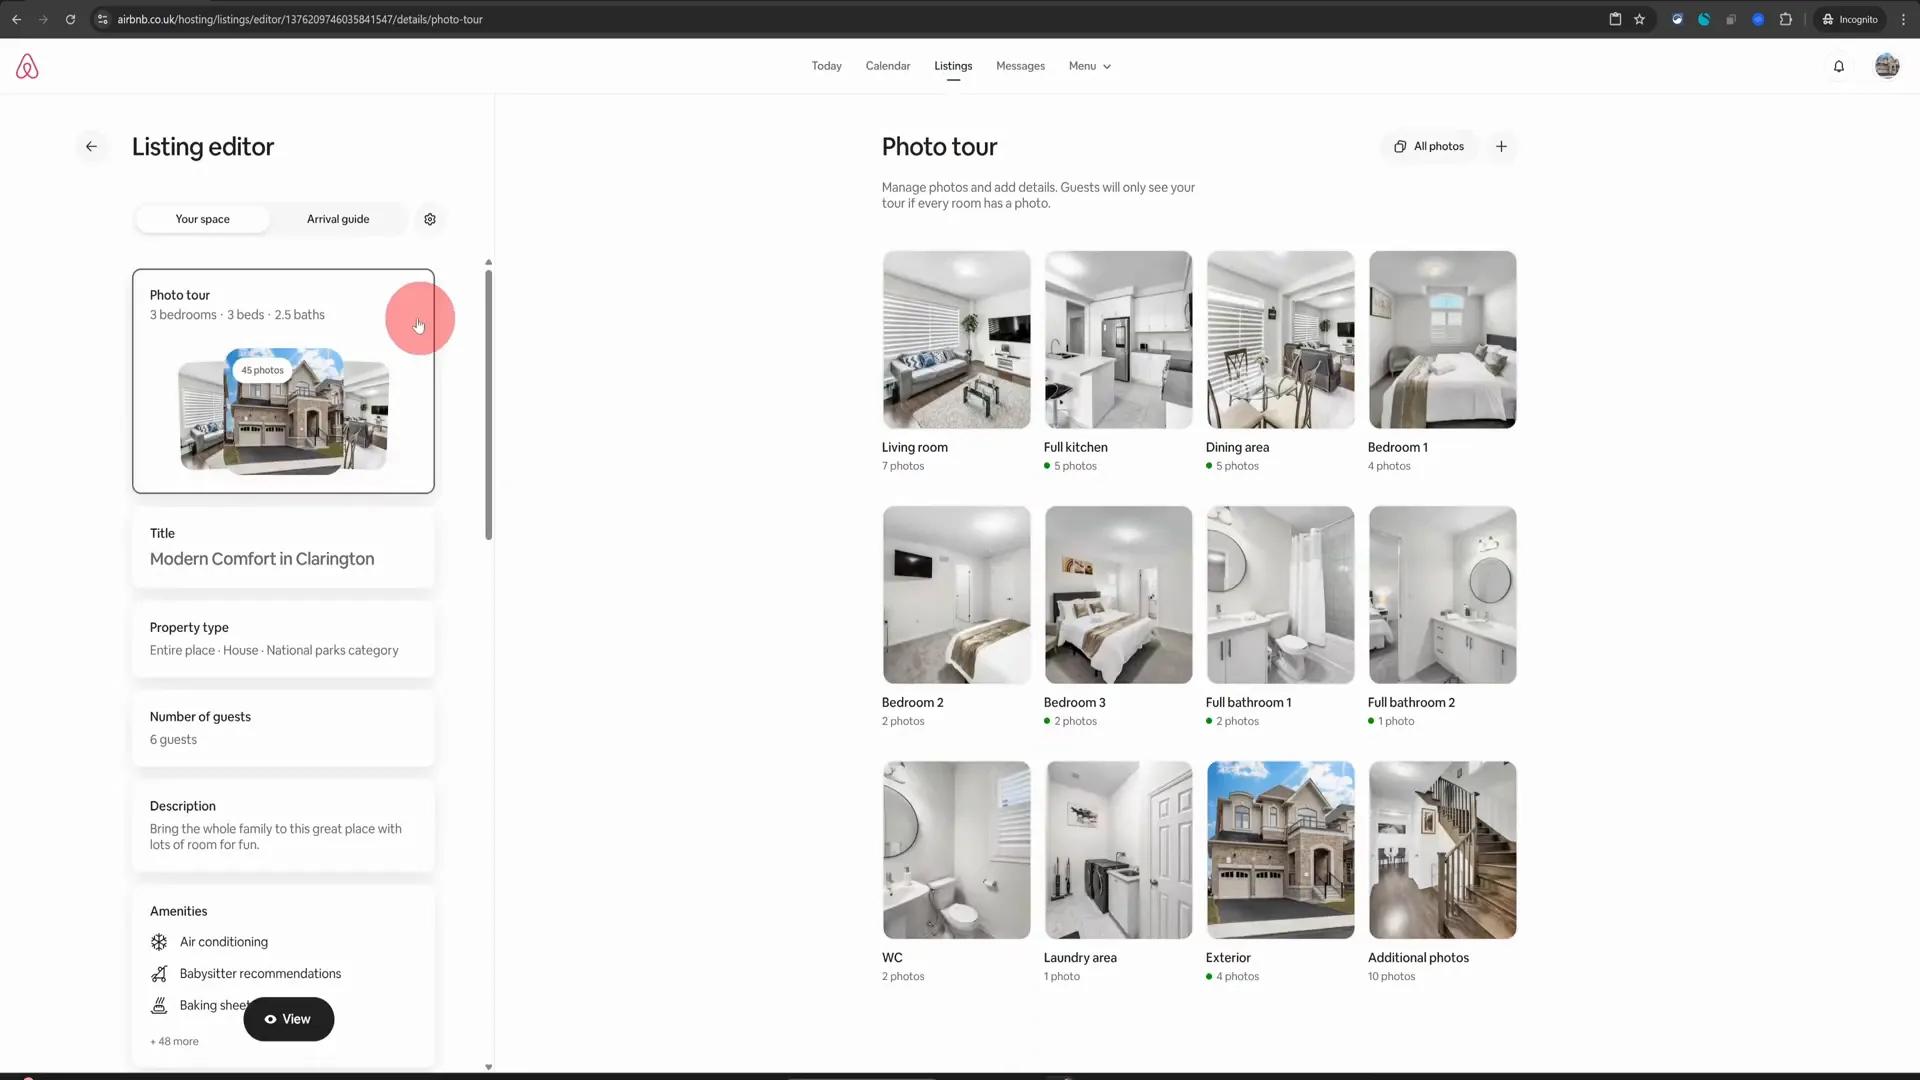
Welcome to our detailed guide on Airbnb hosting tips! Whether you’re a seasoned host or just starting your journey, it’s vital to keep your Airbnb listing updated to attract the right guests. In this article, we’ll walk you through the steps to add or delete rooms in your existing Airbnb listing, ensuring that your property layout reflects your current offerings. Table of Contents Step 1: Log into Your Airbnb Account Step 2: Access Your Hosting Dashboard Step 3: Open Your Listing Editor Step 4: Adding a New Room or Space Step 5: Deleting an Existing Room or Space Step 6: Why Accurate Listings Matter Step 7: Final Touches and Review Frequently Asked Questions (FAQs) Conclusion Step 1: Log into Your Airbnb Account To get started, you’ll want to access your Airbnb account from a computer. While the mobile app is convenient for many tasks, some functionalities like adding or deleting rooms are best executed on the desktop version. Once you’re logged in, navigate to the top right corner of your screen where you will find the option to Switch to Hosting. Step 2: Access Your Hosting Dashboard After switching to hosting mode, you will be directed to your hosting dashboard. Here, you’ll find various options to manage your listings. Click on the Listings option located at the top of the dashboard to view all your properties. Step 3: Open Your Listing Editor Next, click on the image of the listing you want to edit. This will open up the listing editor, where you can manage all aspects of your property. By default, you should land on the Photo Tour section of your property. This is where you can make visual changes, but for now, we will focus on adding or deleting rooms. Step 4: Adding a New Room or Space If you’re looking to add a new room or space—perhaps a recently renovated bathroom or a new sunroom—this process is straightforward. Look for the plus icon in the listing editor. Clicking this will allow you to add a room or space. Once you click on the plus icon, select Add a Room or Space. You will then be prompted to choose the type of area you want to add, such as a bedroom, dining area, or media room. This flexibility allows you to accurately represent your property to potential guests. Step 5: Deleting an Existing Room or Space On the other hand, if you have a room or space that is no longer available, you can delete it easily. First, navigate to the section of your listing that displays your current rooms and spaces. Once there, you will find the option labeled Delete a Room or Space at the bottom of the screen. Click on this option, and you will need to confirm the deletion. This action will immediately remove the selected space from your property listing. It’s crucial to keep your listing accurate to maintain visibility and attract the right guests. Step 6: Why Accurate Listings Matter Updating your listing by adding or deleting rooms not only keeps your property information current but also impacts your visibility on Airbnb. Guests often filter listings based on specific features, such as the number of rooms or private spaces. Therefore, being precise about what you offer can significantly enhance your booking rate. Inaccurate listings can lead to guest dissatisfaction and negative reviews, which can hurt your search rank on Airbnb. By ensuring that your listing reflects the actual state of your property, you’re more likely to attract guests who are looking for precisely what you have to offer. Step 7: Final Touches and Review After making your changes, take a moment to review your listing. Ensure that all details, including descriptions and amenities, are up to date. A well-maintained listing not only appeals to potential guests but also reflects your commitment as a host. Once you’re satisfied with your updates, don’t forget to save your changes. Regularly revisiting your listing will help you stay competitive in the ever-evolving landscape of Airbnb hosting. Frequently Asked Questions (FAQs) 1. Can I add multiple rooms at once? Currently, Airbnb does not allow bulk additions; you will need to add each room or space individually. 2. What if I accidentally delete a room? If you accidentally delete a room, you will need to re-add it as if it were a new space. Always double-check before confirming any deletions. 3. Will changing my listing affect my current bookings? Updating your listing will not affect current bookings, but it is advisable to notify guests if significant changes occur that may impact their stay. 4. How often should I update my listing? It’s good practice to review your listing at least once every few months or after any significant changes to your property. 5. Can I edit my listing from the mobile app? While some changes can be made via the app, adding or deleting rooms is best done on a computer for a smoother experience. Conclusion In summary, managing your Airbnb listing by adding or deleting rooms is straightforward, especially when you follow these steps. Keeping your listing accurate not only helps in attracting the right guests but also enhances your overall hosting experience. Remember, a well-maintained property is more likely to receive positive reviews and repeat bookings. We hope you found this guide helpful. For more Airbnb hosting tips and tutorials, be sure to subscribe to our channel and stay updated on the latest strategies to elevate your hosting game. Have a wonderful day wherever you are!
Airbnb Hosting Tips: How to Add Beds & Sleeping Arrangements on Airbnb
Welcome to your ultimate guide on enhancing your Airbnb listing! If you’re looking to optimise your property for potential guests, understanding how to add sleeping arrangements is crucial. Whether it’s a king bed in the master bedroom, a sofa bed in the living area, or even an air mattress for extra guests, showcasing your sleeping accommodations accurately can significantly improve your booking rate. In this blog post, I will walk you through the steps to add beds and sleeping arrangements to your Airbnb listing effectively, based on the latest 2025 update. Table of Contents Step 1: Log In and Switch to Hosting Mode Step 2: Access Your Listings Step 3: Navigate to the Listing Editor Step 4: Adding New Spaces Step 5: Specifying Sleeping Arrangements Step 6: Highlighting Other Areas Step 7: Final Review and Save Changes Best Practices for Improving Guest Clarity Why Accurate Sleeping Information Matters Frequently Asked Questions (FAQ) Step 1: Log In and Switch to Hosting Mode To start, you need to log into your Airbnb account from a computer. It’s important to note that the mobile app is not suited for these changes. Once you’re logged in, look for the “Switch to Hosting” button located at the top right corner of the page. Click on it, and you’ll be directed to your hosting dashboard. Step 2: Access Your Listings Now that you’re in the hosting dashboard, click on the “Listings” option at the top of the page. This will bring up a list of your properties. Click on the image of the listing you wish to edit. This action opens the listing editor where you can make all the necessary adjustments to your property. Step 3: Navigate to the Listing Editor Upon entering the listing editor, you’ll find yourself on the photo tour section by default. On the right-hand side, all the spaces in your property will be displayed. This layout is designed to make it easy for you to add or modify information about your spaces. Step 4: Adding New Spaces If you want to add a new space, simply click on the plus button. This will give you the option to add a room or space, such as a balcony, courtyard, or any other area that your property might have. This feature is particularly useful for showcasing unique aspects of your listing that could attract more guests. Step 5: Specifying Sleeping Arrangements Let’s say you have a sofa bed in your living room. To highlight this, click on the “Living Room” section. Just below the photos, you’ll see the “Sleeping Arrangements” option. Click on that, and on the right side, you can select the type of sleeping space available. For instance, if you have an air bed, simply click on “plus one” and then hit “save.” Step 6: Highlighting Other Areas Repeat the process for any other areas in your property where guests can sleep. This might include bedrooms, basements, or even attics if they are furnished for sleeping. Ensure you go through the entire list of spaces in your property to provide a comprehensive overview of the sleeping arrangements available. Step 7: Final Review and Save Changes Once you have added all the necessary sleeping arrangements, take a moment to review your changes. Make sure that all the information is accurate and clearly presented. After your review, don’t forget to click on “save” to ensure all your changes are updated in your listing. Best Practices for Improving Guest Clarity Providing clear and accurate sleeping arrangements is not just about filling out the forms. It plays a significant role in guest satisfaction and can help minimise cancellations. Here are some best practices to consider: Be Specific: Clearly state the type of bed available in each area. For example, instead of just saying “bed,” specify if it’s a queen, king, or twin bed. Include All Sleeping Options: If you have multiple sleeping arrangements, list them all. This includes sofa beds, air mattresses, and any other sleeping facilities. Highlight Unique Features: If your property has a unique sleeping arrangement, such as bunk beds or a pull-out couch, make sure to point this out. Use Quality Photos: Include high-quality images of the sleeping spaces. This helps set clear expectations and can lead to higher booking rates. Why Accurate Sleeping Information Matters Airbnb’s algorithm favours listings that provide detailed and accurate information about sleeping arrangements. By ensuring that potential guests know exactly where they will sleep, you boost their confidence in your listing. This can lead to increased bookings and fewer cancellations, ultimately improving your overall success as an Airbnb host. Frequently Asked Questions (FAQ) 1. Can I change the sleeping arrangements after I’ve published my listing? Absolutely! You can go back and edit your listing at any time. Just follow the steps outlined above to make changes to your sleeping arrangements. 2. Is it necessary to add sleeping arrangements for all spaces? While it’s not mandatory, adding sleeping arrangements for all spaces helps guests understand the full potential of your property, which can lead to more bookings. 3. How can I make my listing stand out? In addition to providing detailed sleeping arrangements, consider adding unique features or amenities your property offers. High-quality photos and a well-written description can also help your listing stand out. 4. What if I have a unique sleeping arrangement that isn’t listed? If you have a unique arrangement, you can describe it in the listing description. Consider mentioning it in the title as well to grab attention. 5. Can I add sleeping arrangements from my mobile app? Currently, it’s recommended to make these changes from a computer as the mobile app may not support all features related to sleeping arrangements. In conclusion, adding sleeping arrangements to your Airbnb listing is a straightforward process that can significantly enhance your property’s appeal. By following these steps and best practices, you can ensure that your guests have clear expectations about their sleeping accommodations, leading to a better experience for everyone involved. Happy hosting!
Airbnb Hosting Tips: How to Add an Ensuite Bathroom to Your Airbnb Listing
Welcome to the world of Airbnb hosting! If you have an ensuite or private bathroom in your property, it’s essential to showcase this feature effectively in your listing. Not only does it enhance the guest experience, but it can also significantly increase your booking rates. In this guide, we’ll walk you through the steps to add an ensuite bathroom to your Airbnb listing using simple and straightforward methods. So, let’s dive in! Table of Contents Step 1: Log into Your Airbnb Account Step 2: Navigate to Your Listings Step 3: Access the Listing Editor Step 4: Select the Bedroom with the Ensuite Step 5: Update Sleeping Arrangements Step 6: Configure Privacy Info Step 7: Enable the Ensuite Feature Step 8: Benefits of Highlighting an Ensuite Bathroom Step 9: Review Your Listing Step 10: Monitor Your Bookings Frequently Asked Questions Conclusion Step 1: Log into Your Airbnb Account First things first, you’ll want to access your Airbnb account from a computer. While the mobile app is handy for on-the-go management, certain features—like configuring your listing—are much easier to navigate on a desktop. Once you’re logged in, look for the Switch to Hosting button located at the top right of the screen. This will bring you to your hosting dashboard. Step 2: Navigate to Your Listings In your hosting dashboard, you’ll see several options. Click on Listings located in the top menu. This section is where all your property listings are displayed. Here, you can manage and edit each listing individually. Step 3: Access the Listing Editor Once you click on Listings, you’ll be taken to a page displaying all your properties. Choose the property that has the ensuite bathroom you want to configure. Click on that listing, and it will open up the listing editor. By default, it will land you on a screen that provides an overview of your property’s details. Step 4: Select the Bedroom with the Ensuite Now, let’s assume you have an ensuite bathroom in Bedroom Number Two. Click on that bedroom to access its specific settings. On the next page, you’ll notice several options related to the room’s features. Step 5: Update Sleeping Arrangements The first option you’ll encounter is Sleeping Arrangements. This section allows you to specify the types of beds available in that room. It’s crucial to provide accurate information here to ensure guests know exactly what to expect during their stay. Step 6: Configure Privacy Info After you’ve updated the sleeping arrangements, look for the Privacy Info section. This is where you can highlight the unique features of the room, including the ensuite bathroom. Click on this section, and you will see an option for Private Attached Bathroom. Step 7: Enable the Ensuite Feature To add the ensuite bathroom feature, simply toggle the button to the On position. Once you do this, make sure to click on Save to ensure your changes are recorded. This small step can make a significant difference in how your listing appears to potential guests. Step 8: Benefits of Highlighting an Ensuite Bathroom Once you’ve added the ensuite bathroom feature, Airbnb will start highlighting this amenity on your listing. Why is this important? Guests often search for properties that offer comfort and privacy, and an ensuite bathroom can be a key selling point. By showcasing this feature, you’re likely to attract more bookings, especially from guests who value their personal space. Step 9: Review Your Listing After saving your changes, take a moment to review your listing. Make sure that all the information is accurate and that the ensuite feature is displayed prominently. This is also a good time to check other aspects of your listing, such as photos and descriptions, to ensure everything aligns with your offering. Step 10: Monitor Your Bookings Once your listing is updated, keep an eye on your bookings. You may notice an increase in inquiries and reservations, thanks to the added visibility of your ensuite bathroom. Don’t forget to respond promptly to any messages from potential guests to maintain a good relationship and encourage bookings. Frequently Asked Questions 1. Why should I highlight an ensuite bathroom in my listing? Highlighting an ensuite bathroom can significantly enhance your property’s appeal, as many guests prioritize privacy and comfort. It can lead to more bookings and higher guest satisfaction. 2. Can I add multiple ensuite bathrooms to my listing? Yes, you can configure multiple ensuite bathrooms by following the same steps for each bedroom that has this feature. Just ensure you toggle the appropriate options for each room. 3. Will adding an ensuite bathroom increase my nightly rate? Yes, properties with ensuite bathrooms can often command higher nightly rates due to the added comfort and privacy they offer guests. However, it’s essential to assess your local market to determine a competitive price. 4. How can I make my listing stand out even more? In addition to highlighting the ensuite bathroom, consider improving your listing’s overall appeal by adding high-quality photos, writing a compelling description, and gathering positive guest reviews. Conclusion In summary, adding an ensuite bathroom to your Airbnb listing is a straightforward process that can significantly enhance your property’s attractiveness. By following these steps, you can ensure that potential guests are aware of this valuable feature, leading to increased bookings and more satisfied guests. Remember, every small detail counts in the competitive world of Airbnb hosting. So go ahead, make those updates, and watch your bookings soar! Thank you for joining me on this journey to improve your Airbnb hosting experience. For more tips and tricks, feel free to explore additional resources or connect with me directly for a FREE listing review. Happy hosting!
Airbnb Hosting Tips: How to Add or Delete Photos on Your Airbnb Listing (2025 Update)

Managing your Airbnb listing effectively is crucial for attracting guests and ensuring a successful hosting experience. One of the key elements that can significantly impact your listing’s appeal is the quality and relevance of your photos. In this guide, we’ll explore how to add or delete photos from your Airbnb listing quickly and efficiently. Whether you’re looking to refresh your images or remove outdated ones, this tutorial will provide you with all the necessary steps. Let’s dive into the world of Airbnb hosting tips! Table of Contents Step 1: Access Your Hosting Dashboard Step 2: Navigate to Your Listings Step 3: Open the Photo Editor Step 4: Adding New Photos Step 5: Deleting Existing Photos Step 6: Finalizing Your Changes Pro Tips for Successful Airbnb Listings Frequently Asked Questions (FAQ) Conclusion Step 1: Access Your Hosting Dashboard To begin, you want to make sure that you are using a desktop computer. While the Airbnb mobile app is convenient for many tasks, it is not well-suited for managing your photo listings. Once you’re ready, log into your Airbnb account from your computer. On the top right corner, you’ll see an option to Switch to Hosting. Click on this option to navigate to your hosting dashboard. Step 2: Navigate to Your Listings Once you are in your hosting dashboard, locate the Listings option in the top menu. This is where you can manage all aspects of your properties. Click on it, and you will see all your listings displayed. Find the listing for which you want to add or delete photos. Step 3: Open the Photo Editor Now, click on your listing image to open the listing editor. By default, the editor will select the Photo Tour option on the left-hand side, allowing you to see all your images on the right. This is where the magic happens! Step 4: Adding New Photos If you want to enhance your listing, adding new photos is a great way to do it! To add more photos, look for the plus icon within the editor. Clicking on this icon will present you with an Add Photos option. Select this, and you will be prompted to choose the photos you wish to upload from your computer. When selecting photos, aim for high-quality images that showcase your property effectively. It’s recommended to include a mix of wide-angle shots and close-up details to attract potential guests. Make sure that your images are well-lit and capture the essence of your space! Step 5: Deleting Existing Photos Sometimes, you may find that certain photos no longer represent your property well. In such cases, it’s essential to remove them. To do this, click on the All Photos option. This will display all the images currently associated with your listing. Scroll through the images until you find the one you want to delete. Once located, click on the delete icon in the top right corner of that image. Be cautious! When you confirm the deletion, the photo will be permanently removed from your listing. Take a moment to ensure that you are deleting the correct photo, as this action cannot be undone. Step 6: Finalizing Your Changes After adding or removing photos, it’s always a good idea to review your listing. Make sure that the new photos are displayed correctly and that your listing still conveys the right message to potential guests. Once satisfied, you can save your changes and exit the editor. Pro Tips for Successful Airbnb Listings High-Quality Images: Always prioritize high-resolution photos. Blurry or poorly lit images can deter potential guests. Diverse Angles: Include a variety of shots, such as wide-angle views of rooms, close-ups of unique features, and even outdoor spaces. Regular Updates: Keep your listing fresh by regularly updating photos, especially after any renovations or decor changes. Engaging Captions: Consider adding captions or descriptions for each photo to highlight special features or amenities. Frequently Asked Questions (FAQ) Q1: Can I add photos from my mobile device? A1: While you can manage your Airbnb listing from a mobile device, it’s recommended to use a desktop computer for adding or deleting photos, as the mobile app does not support these features effectively. Q2: How many photos can I upload to my listing? A2: Airbnb allows you to upload multiple photos to your listing. However, it’s best to focus on quality over quantity. Aim for a well-rounded selection that showcases your property effectively. Q3: What types of photos should I include? A3: Include a mix of wide-angle shots, close-ups of details, and images of amenities. Highlight unique features of your property to capture guests’ attention. Q4: Can I edit the photos after uploading them? A4: No, once photos are uploaded, you cannot edit them directly within Airbnb. You would need to delete the existing photo and upload a new version if changes are necessary. Q5: Is there a recommended order for my listing photos? A5: Yes, it’s advisable to start with the most appealing and spacious images first, such as living areas or bedrooms, to draw guests in. Follow with images of bathrooms, kitchens, and unique features. Conclusion Updating your Airbnb listing with fresh and relevant photos is a vital part of attracting guests and enhancing their booking experience. By following these simple steps to add or delete photos, you’ll ensure that your listing remains appealing and up-to-date. Remember, high-quality images can make a significant difference in how potential guests perceive your property. So, whether you’re looking to refresh your image gallery or remove outdated photos, you now have the knowledge to do so effectively. Happy hosting, and may your Airbnb journey be filled with success!
Airbnb Hosting Tips: Only Accept Guests with Photos on Airbnb (Here’s How)
Welcome to your go-to resource for Airbnb hosting tips! Today, we’ll dive into a crucial aspect of managing your Airbnb listing: requiring guests to have a profile photo. This simple yet effective practice can enhance transparency and trust between you and your guests, making your hosting experience smoother and more secure. Let’s explore how you can set this requirement in your Airbnb listing step-by-step. Table of Contents Step 1: Access Your Hosting Dashboard Step 2: Navigate to Your Listings Step 3: Open the Listing Editor Step 4: Set Guest Requirements Step 5: Understand Privacy and Verification Why Require a Profile Photo? Common Questions About Requiring Profile Photos Conclusion Step 1: Access Your Hosting Dashboard The first step to requiring a profile photo from your guests is to log into your Airbnb account. Once you’re logged in, look at the top right corner of your screen. You’ll see an option that says “Switch to Hosting.” Click on this, and it will take you to your hosting dashboard. Step 2: Navigate to Your Listings Now that you’re in your hosting dashboard, locate the “Listings” tab. Click on it to view all your current listings. From here, select the specific listing for which you want to require a profile photo. This will open up your listing editor, where you can make various adjustments to your listing settings. Step 3: Open the Listing Editor In the listing editor, you’ll find a variety of options to customize your listing. Look for the cog wheel icon next to the Arrival Guide. Clicking on this cog wheel will take you to a new screen where you can adjust more detailed settings for your listing. Step 4: Set Guest Requirements On the next screen, scroll down until you find the fourth option labeled “Guest Requirements.” This is where you can set specific criteria for guests who wish to book your property. Simply flick the button that says “Require a Profile Photo.” By enabling this setting, only guests who have uploaded a profile picture will be able to send you a booking request. Step 5: Understand Privacy and Verification It’s important to note that while you will require a profile photo, you won’t be able to see it until the booking is confirmed. This is a privacy measure that Airbnb has implemented to prevent discrimination and protect guests’ identities. Even if you choose to require a profile photo, Airbnb has built-in measures to verify the identity of all users. Every guest must have their email address, phone number, and payment information verified before they can make a reservation. Additionally, they must agree to your house rules. This means that even without the profile photo requirement, Airbnb takes significant steps to ensure that you are dealing with legitimate guests. Why Require a Profile Photo? Now that you understand how to enable the profile photo requirement, you may be wondering why it’s beneficial. Here are a few reasons: Enhanced Trust: A profile photo adds a layer of transparency, making it easier for you to feel comfortable with who you’re hosting. Improved Communication: Guests with photos are often more engaged and communicative, leading to a better overall experience. Safety and Security: Knowing that guests have a profile picture can help you feel more secure about the booking. Common Questions About Requiring Profile Photos 1. Will I always see the profile photo before confirming a booking? No, you will not be able to see the profile photo until the booking is confirmed. This is done for privacy reasons. 2. What happens if a guest doesn’t have a profile photo? If a guest does not have a profile photo, they will not be able to send you a booking request. This setting helps ensure that you only receive requests from guests who have completed their profiles. 3. Are there other identity checks that Airbnb does? Yes, Airbnb verifies the email addresses, phone numbers, and payment information of all users. They also require guests to agree to your house rules before making a reservation. 4. Can I change this setting later? Absolutely! You can go back into your listing editor at any time to change your guest requirements, including the profile photo setting. Conclusion Requiring a profile photo from your guests is a straightforward yet effective way to enhance your Airbnb hosting experience. By following these simple steps, you can set this requirement in your listing and help foster a more trustworthy and transparent environment for both you and your guests. Remember, a little extra effort can go a long way in ensuring a positive experience for everyone involved. If you found this guide useful, don’t hesitate to explore more of our Airbnb hosting tips and best practices. Happy hosting! For more tips and tutorials on Airbnb hosting, consider visiting the No-Nonsense Airbnb YouTube channel for more insightful content!