

Airbnb Hosting Tips: Finding the Perfect Property for Your Airbnb
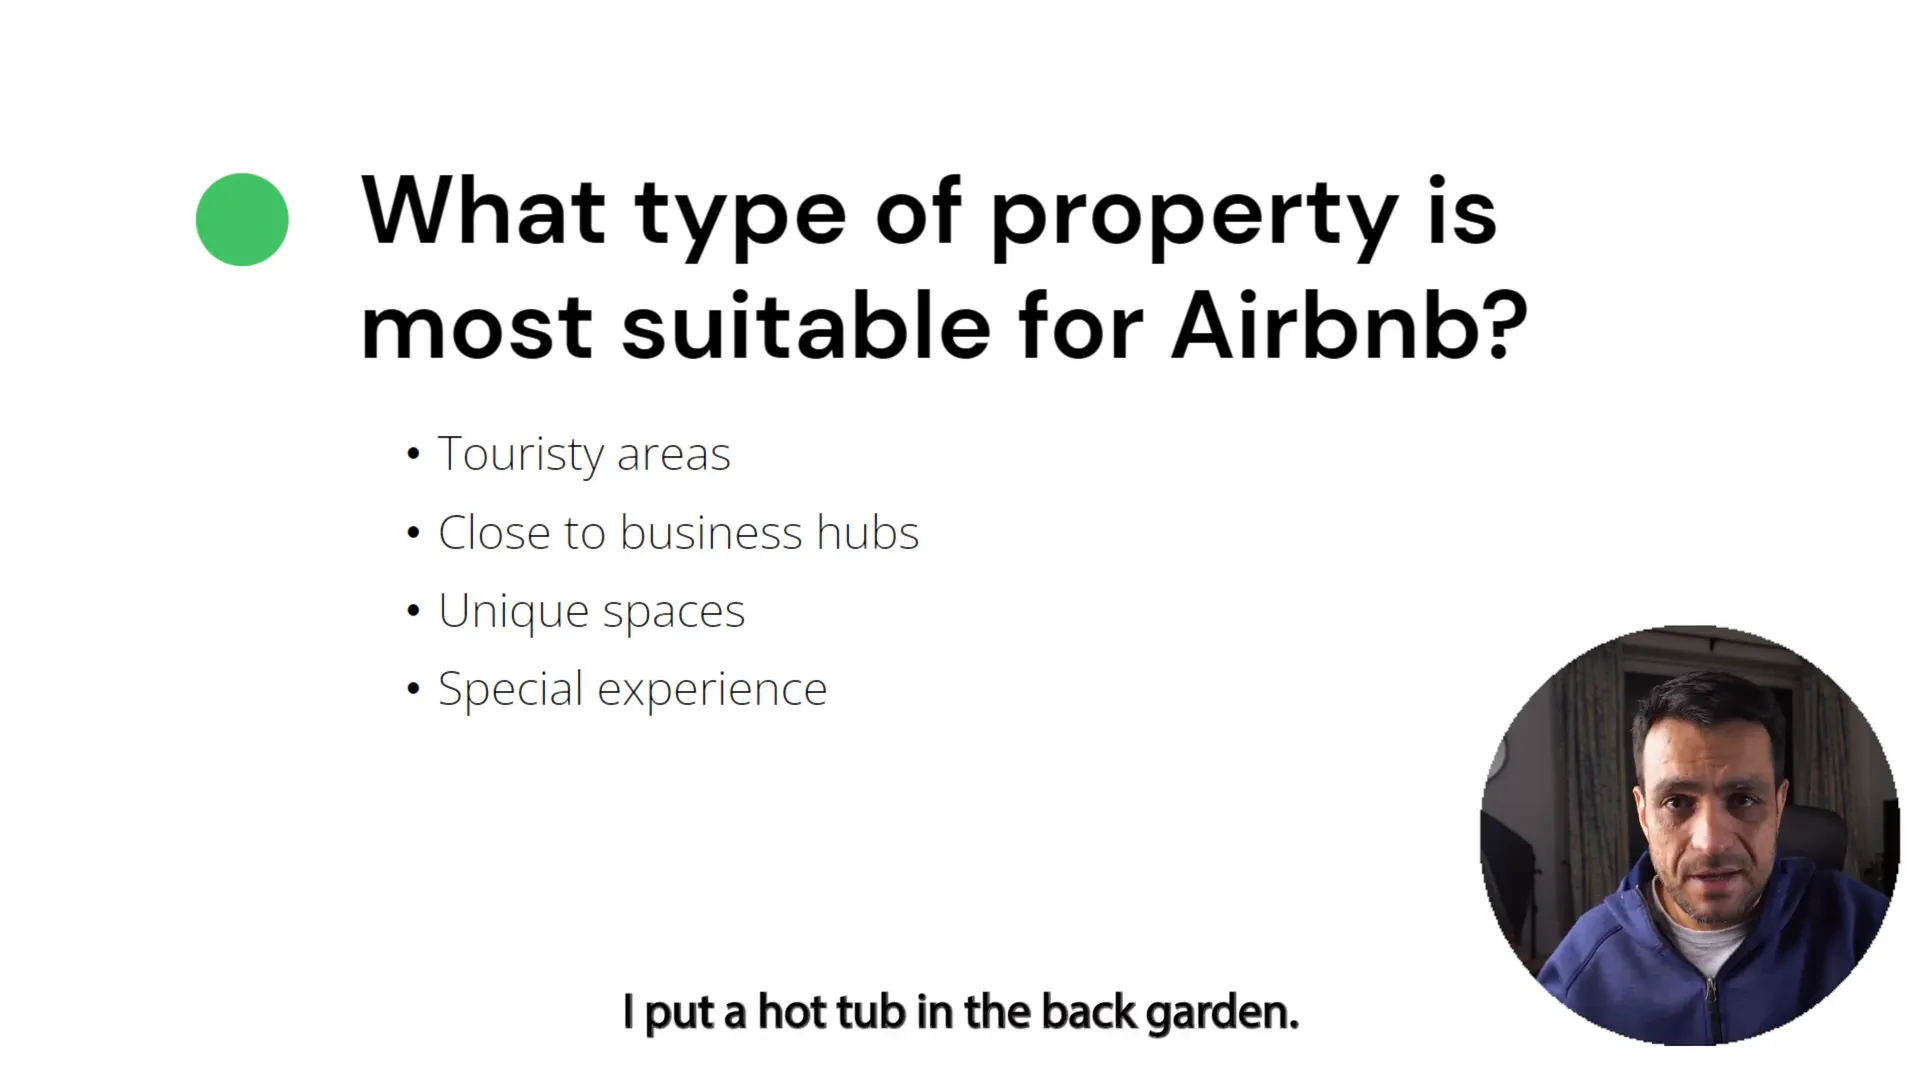
If you’re considering becoming an Airbnb host, one of the most crucial decisions you’ll face is what type of property to offer. The right choice can make or break your hosting experience. In this guide, we will explore essential Airbnb hosting tips to help you find the perfect property and make it stand out, regardless of its location. Table of Contents Step 1: Understand the Importance of Location Step 2: Make Your Property Special Step 3: Offer Unique Experiences Step 4: Leverage Local Demand Step 5: Create a Unique Selling Proposition Step 6: Invest in Quality Amenities Step 7: Optimize Your Listing Step 8: Set Competitive Pricing Step 9: Encourage Guest Feedback Step 10: Continuous Improvement FAQ Step 1: Understand the Importance of Location Location is often regarded as the most significant factor when it comes to Airbnb success. Properties situated in highly desired areas—like city centres, business hubs, or near popular landmarks—tend to attract a consistent flow of guests. However, what if your property isn’t in such a prime location? Don’t fret! There are ways to make your property appealing, even if it’s not in the heart of the action. The key is to focus on unique features and experiences that can draw guests in. Step 2: Make Your Property Special If location isn’t your property’s strongest feature, consider adding something unique to enhance its appeal. Offering an experience alongside the stay can attract guests who are willing to travel a bit further for something extraordinary. For example, a few years ago, I purchased a cottage about an hour’s drive from the city centre of Edinburgh. Many people doubted my decision, claiming that no tourists would go there. However, I added a hot tub to the back garden and created a romantic atmosphere by providing champagne and chocolates on arrival. This transformed the cottage into a sought-after getaway for locals celebrating anniversaries and birthdays. Step 3: Offer Unique Experiences Another example involves a gentleman I met who owned a 20-acre farmhouse that was quite uneventful. After struggling to get bookings on Airbnb for months, we brainstormed ideas and settled on offering a treasure hunt experience on his property. All it took was a couple of metal detectors, and the farmhouse became a massive hit with families looking for unique activities. Step 4: Leverage Local Demand Even if your property is in a less touristy area, locals can be your best guests. They often look for unique experiences, and if you can provide that, you won’t have to worry about bookings. Whether it’s a romantic getaway or a family-friendly adventure, catering to your local market can be incredibly rewarding. Step 5: Create a Unique Selling Proposition What sets your property apart from the competition? Whether it’s a stunning view, a unique design, or special amenities, make sure to highlight these features in your listing. Your unique selling proposition should be clear from the moment potential guests see your listing. Think about what makes your property special—perhaps it’s a historic building, eco-friendly features, or proximity to nature trails. Whatever it is, ensure that it’s front and centre in your marketing. Step 6: Invest in Quality Amenities Guests appreciate amenities that enhance their stay. Consider what additional features you can offer to make their experience memorable. Hot tubs, fireplaces, or even unique decor can create a lasting impression. The more comfortable and enjoyable their stay, the more likely they are to leave positive reviews and return in the future. Step 7: Optimize Your Listing Once you’ve established what makes your property unique, it’s time to optimize your Airbnb listing. Use compelling language that resonates with your target audience. Be sure to include high-quality photos that showcase your property’s best features. Listings with great visuals tend to attract more bookings. Step 8: Set Competitive Pricing Pricing your property correctly is essential for attracting guests. Research similar listings in your area to understand the market rates. Ensure your pricing aligns with the amenities and experiences you offer. Remember, a fair price can lead to higher occupancy rates, especially if you’re providing unique experiences that guests can’t find elsewhere. Step 9: Encourage Guest Feedback After hosting, encourage your guests to leave feedback. Positive reviews can significantly boost your credibility and attract more bookings. If you receive constructive criticism, use it to improve your property and hosting skills. Show potential guests that you’re committed to providing an exceptional experience. Step 10: Continuous Improvement Lastly, always look for ways to improve your property and hosting experience. Stay updated on trends in the Airbnb market and adapt accordingly. Whether it’s introducing new amenities or changing your marketing strategy, being proactive can keep your property competitive and appealing. FAQ What type of property works best on Airbnb? Properties in desirable locations with unique features or experiences tend to perform best. However, even less popular areas can succeed with the right offerings. How can I make my property stand out? Focus on unique selling points, such as special amenities, experiences, or a captivating design. Highlight these features in your listing. Is it worth it to host on Airbnb? Yes, hosting on Airbnb can be a lucrative venture if done correctly. Understanding your market and providing a unique experience are key to success. Can locals be good guests? Absolutely! Locals often seek unique experiences for celebrations or getaways and can be a great source of consistent bookings. How important are reviews for my Airbnb? Reviews are crucial. They build trust with potential guests and can significantly influence booking decisions. Encourage your guests to leave feedback.
Airbnb Hosting Tips: Why Choose Airbnb Over Long-Term Renting
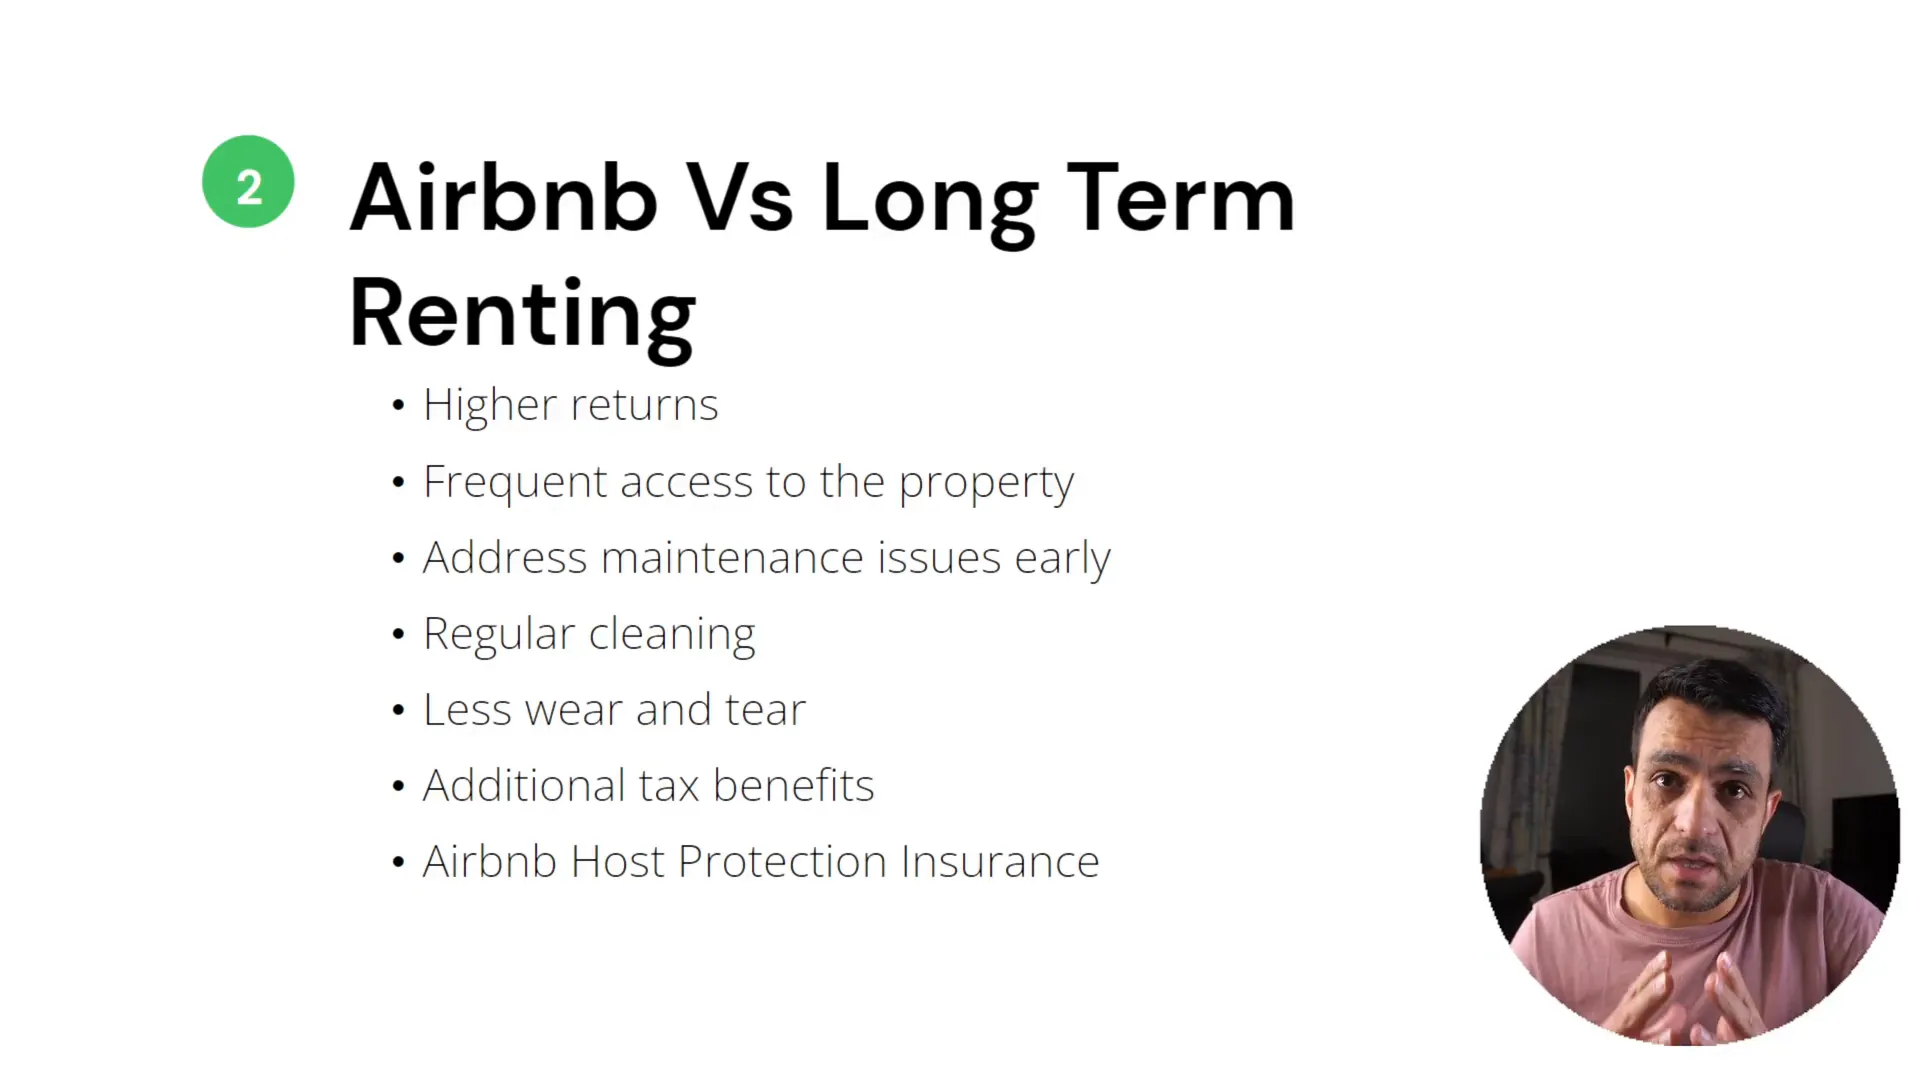
If you’re considering renting out your property, the choice between Airbnb hosting and long-term renting can be daunting. However, Airbnb offers numerous advantages that can lead to higher returns, greater flexibility, and a more enjoyable hosting experience. In this guide, we will explore essential Airbnb hosting tips that will help you understand why Airbnb might be the smarter option for your rental property. Table of Contents Step 1: Understand the Higher Returns Step 2: Enjoy Frequent Access to Your Property Step 3: Address Maintenance Issues Promptly Step 4: Benefit from Regular Cleaning Step 5: Take Advantage of Tax Benefits Step 6: Leverage Airbnb Host Protection Insurance Step 7: Flexibility in Hosting Step 8: Enjoy the Community and Experience Step 9: Understand the Risks and Responsibilities Step 10: Engage with Your Guests Frequently Asked Questions (FAQs) Step 1: Understand the Higher Returns One of the most compelling reasons to choose Airbnb is the potential for significantly higher returns. Many hosts report earning two to three times the revenue compared to traditional long-term renting. This isn’t just anecdotal; it’s a trend observed across various locations worldwide. If you manage your property effectively, it’s reasonable to expect similar returns. This financial incentive is often the initial push for many landlords to switch to short-term rentals. Step 2: Enjoy Frequent Access to Your Property Another key advantage of Airbnb hosting is the frequent access you have to your property. Unlike long-term tenants, guests come and go, allowing you to visit your property regularly. You can check in during cleaning hours or even block the calendar to use the property yourself or accommodate friends and family. This flexibility is invaluable, especially if you have personal ties to the property or want to ensure it remains in excellent condition. Step 3: Address Maintenance Issues Promptly With frequent guest turnover and regular cleaning, you can quickly identify and address maintenance issues. You won’t have to rely on tenants to report small problems that could escalate into significant repairs. Guests will often notify you immediately about any issues they encounter, allowing for swift action. This proactive approach helps maintain the property’s condition and can prevent costly repairs down the line. Step 4: Benefit from Regular Cleaning Every time a guest checks out, the property is cleaned, ensuring it remains in good shape. This regular upkeep can lead to less wear and tear compared to long-term rentals, where the property may not be cleaned as frequently. Guests tend to spend more time outside the property, which also reduces wear on furnishings and appliances. Step 5: Take Advantage of Tax Benefits Many countries offer tax benefits for Airbnb hosts that are not available to traditional landlords. In places like the US, Canada, and the UK, you can deduct various expenses related to running your Airbnb. These deductions can significantly reduce your taxable income, making Airbnb hosting an even more appealing option. However, it’s essential to keep detailed records of all expenses to maximize these benefits. Step 6: Leverage Airbnb Host Protection Insurance When you host on Airbnb, you gain access to host protection insurance that covers damages and liability claims. This level of protection is generally not available with long-term tenants. This insurance can provide peace of mind, knowing that you are safeguarded against potential financial losses due to guest-related issues. Step 7: Flexibility in Hosting Airbnb hosting allows you to try out short-term rentals without a long-term commitment. If it doesn’t work out, you can easily switch back to long-term renting. This flexibility is a significant advantage, especially for new hosts testing the waters. In contrast, long-term tenants can be challenging to remove if you decide to change your rental strategy. Step 8: Enjoy the Community and Experience Hosting on Airbnb can be a rewarding experience. You get to meet people from all over the world, share local insights, and create memorable experiences for your guests. This interaction can make hosting a fulfilling venture, unlike long-term renting, which can feel more transactional. Many hosts find joy in curating experiences and creating a welcoming environment for their guests. Step 9: Understand the Risks and Responsibilities While there are numerous benefits to Airbnb hosting, it’s also essential to understand the risks involved. These include managing guest expectations, dealing with potential damages, and ensuring compliance with local regulations. Being proactive and prepared can help mitigate these risks and lead to a successful hosting experience. Make sure to stay updated on local laws regarding short-term rentals to avoid any legal complications. Step 10: Engage with Your Guests Providing excellent customer service can make all the difference in your Airbnb hosting journey. Engaging with guests, being responsive to their needs, and actively seeking feedback can enhance their experience and lead to positive reviews. These reviews can significantly impact your booking rate, making it crucial to maintain high standards in hospitality. Ultimately, satisfied guests are more likely to return and recommend your property to others. Frequently Asked Questions (FAQs) 1. Is Airbnb hosting more profitable than long-term renting? Yes, many hosts report earning significantly higher returns through Airbnb compared to traditional long-term renting. 2. What are the main risks of Airbnb hosting? Risks include property damage, guest-related issues, and compliance with local regulations. 3. How can I maximize my Airbnb income? Optimize your listing, engage with guests, and leverage seasonal pricing strategies to maximize your income. 4. What insurance do I need for Airbnb hosting? Airbnb provides host protection insurance, but it’s advisable to have additional coverage for comprehensive protection. 5. Can I switch back to long-term renting if Airbnb doesn’t work out? Yes, Airbnb hosting allows for flexibility, and you can easily switch back to long-term renting if desired. In conclusion, understanding the advantages of Airbnb hosting can significantly impact your rental strategy. With higher returns, frequent access to your property, and various protections, Airbnb presents a compelling option for property owners. Embrace the journey, and happy hosting!
Airbnb Hosting Tips: How Airbnb Stands Out from Other Platforms
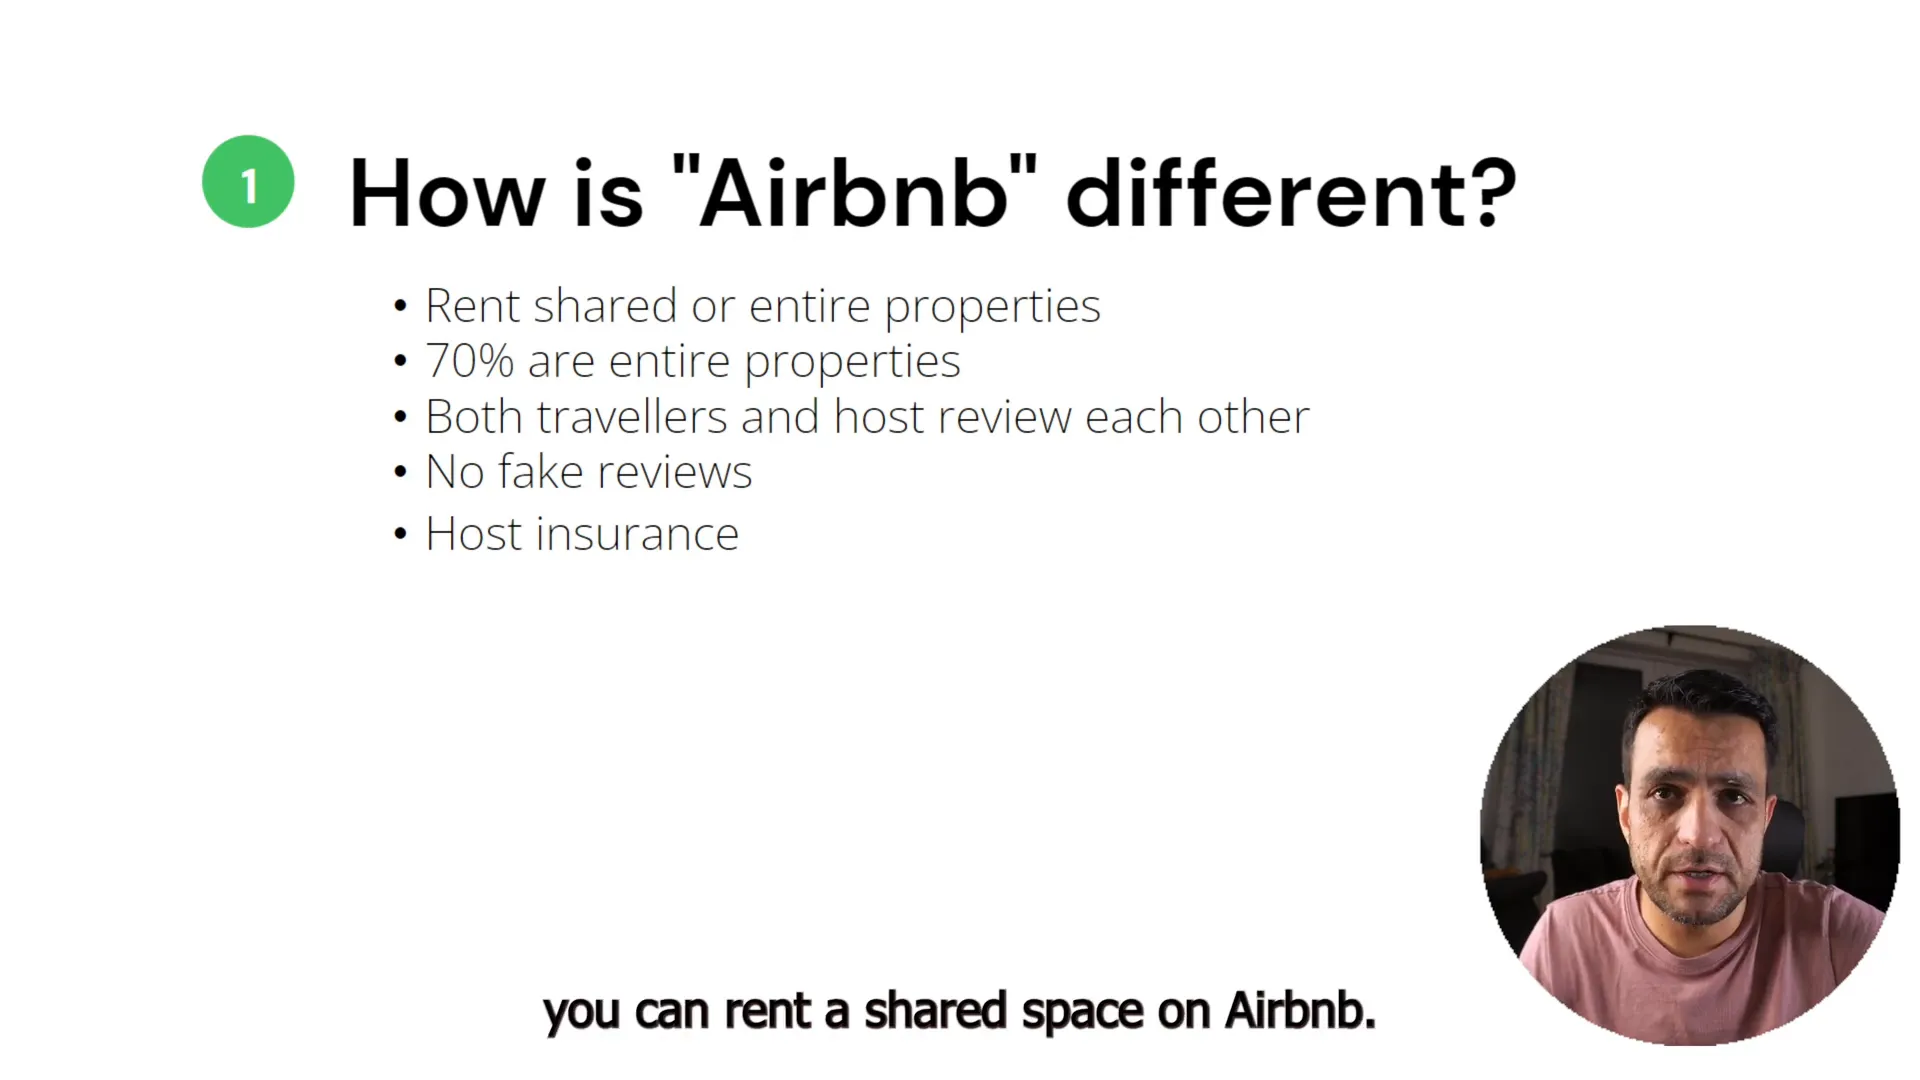
When it comes to short-term rental platforms, understanding the unique features of Airbnb can significantly enhance your hosting experience. In this guide, we’ll explore essential Airbnb hosting tips that highlight what makes Airbnb different and how you can leverage these differences to your advantage. Whether you’re considering hosting for the first time or looking to refine your strategy, these insights will help you navigate the world of Airbnb with confidence. Table of Contents Step 1: Understand the Unique Rental Options on Airbnb Step 2: Take Advantage of the Review System Step 3: Know the Review Policy Step 4: Leverage Host Insurance Step 5: Start with Airbnb for New Hosts Step 6: Maintain High Standards Step 7: Communicate Effectively with Guests Step 8: Set Competitive Pricing Step 9: Create a Welcoming Atmosphere Step 10: Stay Up to Date with Airbnb Policies Frequently Asked Questions Step 1: Understand the Unique Rental Options on Airbnb One of the standout features of Airbnb is its flexibility regarding rental types. Unlike other platforms, Airbnb allows you to rent out a shared space. This means if you live in a three-bedroom apartment, you can rent out just one room while still residing there. This unique aspect of Airbnb caters to a diverse range of hosts and guests. While shared spaces are a significant part of Airbnb’s offerings, it’s worth noting that 70% of the properties listed are entire homes, including apartments, houses, and cottages. This variety ensures that you can cater to different types of travellers, from solo adventurers to families looking for a complete home experience. Step 2: Take Advantage of the Review System Airbnb’s review system is another feature that sets it apart from other platforms. Unlike traditional hospitality models where only guests can leave reviews, Airbnb allows both hosts and guests to review each other. This bidirectional review system builds trust and accountability. Before booking, guests can view detailed profiles, including travel histories and previous reviews. This transparency helps ensure a positive experience for both parties. Many other platforms struggle with fake reviews, but on Airbnb, reviews can only be left after a stay, making them more reliable. Step 3: Know the Review Policy Airbnb has a strict policy regarding reviews: they do not remove them. If a guest leaves a negative review, the host cannot get it taken down, although they can respond publicly. This policy is beneficial for potential guests as it ensures they see all reviews, good or bad, providing a more accurate picture of what to expect. This policy also encourages hosts to maintain high standards, as they cannot erase negative feedback. As a host, this means you should focus on providing excellent service and a clean, welcoming environment to earn positive reviews. Step 4: Leverage Host Insurance Airbnb offers two types of insurance that are particularly advantageous for hosts: liability insurance and damage protection insurance, both up to $1 million. This level of coverage is unmatched by other rental platforms. The damage protection insurance covers any potential damage caused by guests, which can be invaluable for your peace of mind. In contrast to other platforms where hosts may only set a damage deposit, Airbnb’s insurance can cover extensive damages that might occur during a stay. Step 5: Start with Airbnb for New Hosts If you’re new to the short-term rental industry, beginning your hosting journey with Airbnb is a smart move. The platform offers substantial protections and a user-friendly interface that can help ease you into hosting. Once you gain experience, you can explore other platforms that may have more complex operations. As you build your confidence in managing properties and dealing with guests, you can gradually expand your listings to other platforms. This strategy allows you to focus on mastering the Airbnb system first, which is a great foundation for future success. Step 6: Maintain High Standards To succeed on Airbnb, maintaining high standards is crucial. Regularly clean your property and ensure it is well-maintained. Guests often leave reviews based on cleanliness and overall experience, so these factors can significantly impact your ratings. Step 7: Communicate Effectively with Guests Effective communication is key to a successful hosting experience. Be prompt in responding to inquiries and provide clear check-in instructions. Consider using automated messaging tools to streamline communication and enhance the guest experience. Step 8: Set Competitive Pricing Pricing your listing competitively is essential for attracting guests. Research similar listings in your area and adjust your rates accordingly. You can use Airbnb’s smart pricing tool to help set dynamic rates based on demand, seasonality, and local events. Step 9: Create a Welcoming Atmosphere Guests appreciate a welcoming environment. Consider adding personal touches, such as local recommendations or small amenities like snacks or toiletries. These thoughtful gestures can lead to better reviews and repeat bookings. Step 10: Stay Up to Date with Airbnb Policies Airbnb frequently updates its policies and features. Staying informed about these changes can help you leverage new tools and ensure compliance. Regularly check the Airbnb community forums and updates to make the most of your hosting experience. Frequently Asked Questions What types of properties can I list on Airbnb? You can list a variety of properties on Airbnb, including shared spaces, private rooms, and entire homes. The flexibility allows you to cater to different types of guests. How does Airbnb’s review system work? Both guests and hosts can leave reviews for each other after a stay. This system promotes accountability and transparency, helping potential guests make informed decisions. What insurance does Airbnb provide for hosts? Airbnb offers liability insurance and damage protection insurance, both up to $1 million, providing hosts with substantial coverage against potential risks. Is it better to start hosting on Airbnb or another platform? For new hosts, starting with Airbnb is recommended due to its user-friendly interface and comprehensive protections. Once you gain experience, you can explore other platforms. How can I improve my listing’s visibility? To improve visibility, ensure you have high-quality photos, write detailed descriptions, and maintain competitive pricing.
Airbnb Hosting Tips: How to Block Someone on Airbnb
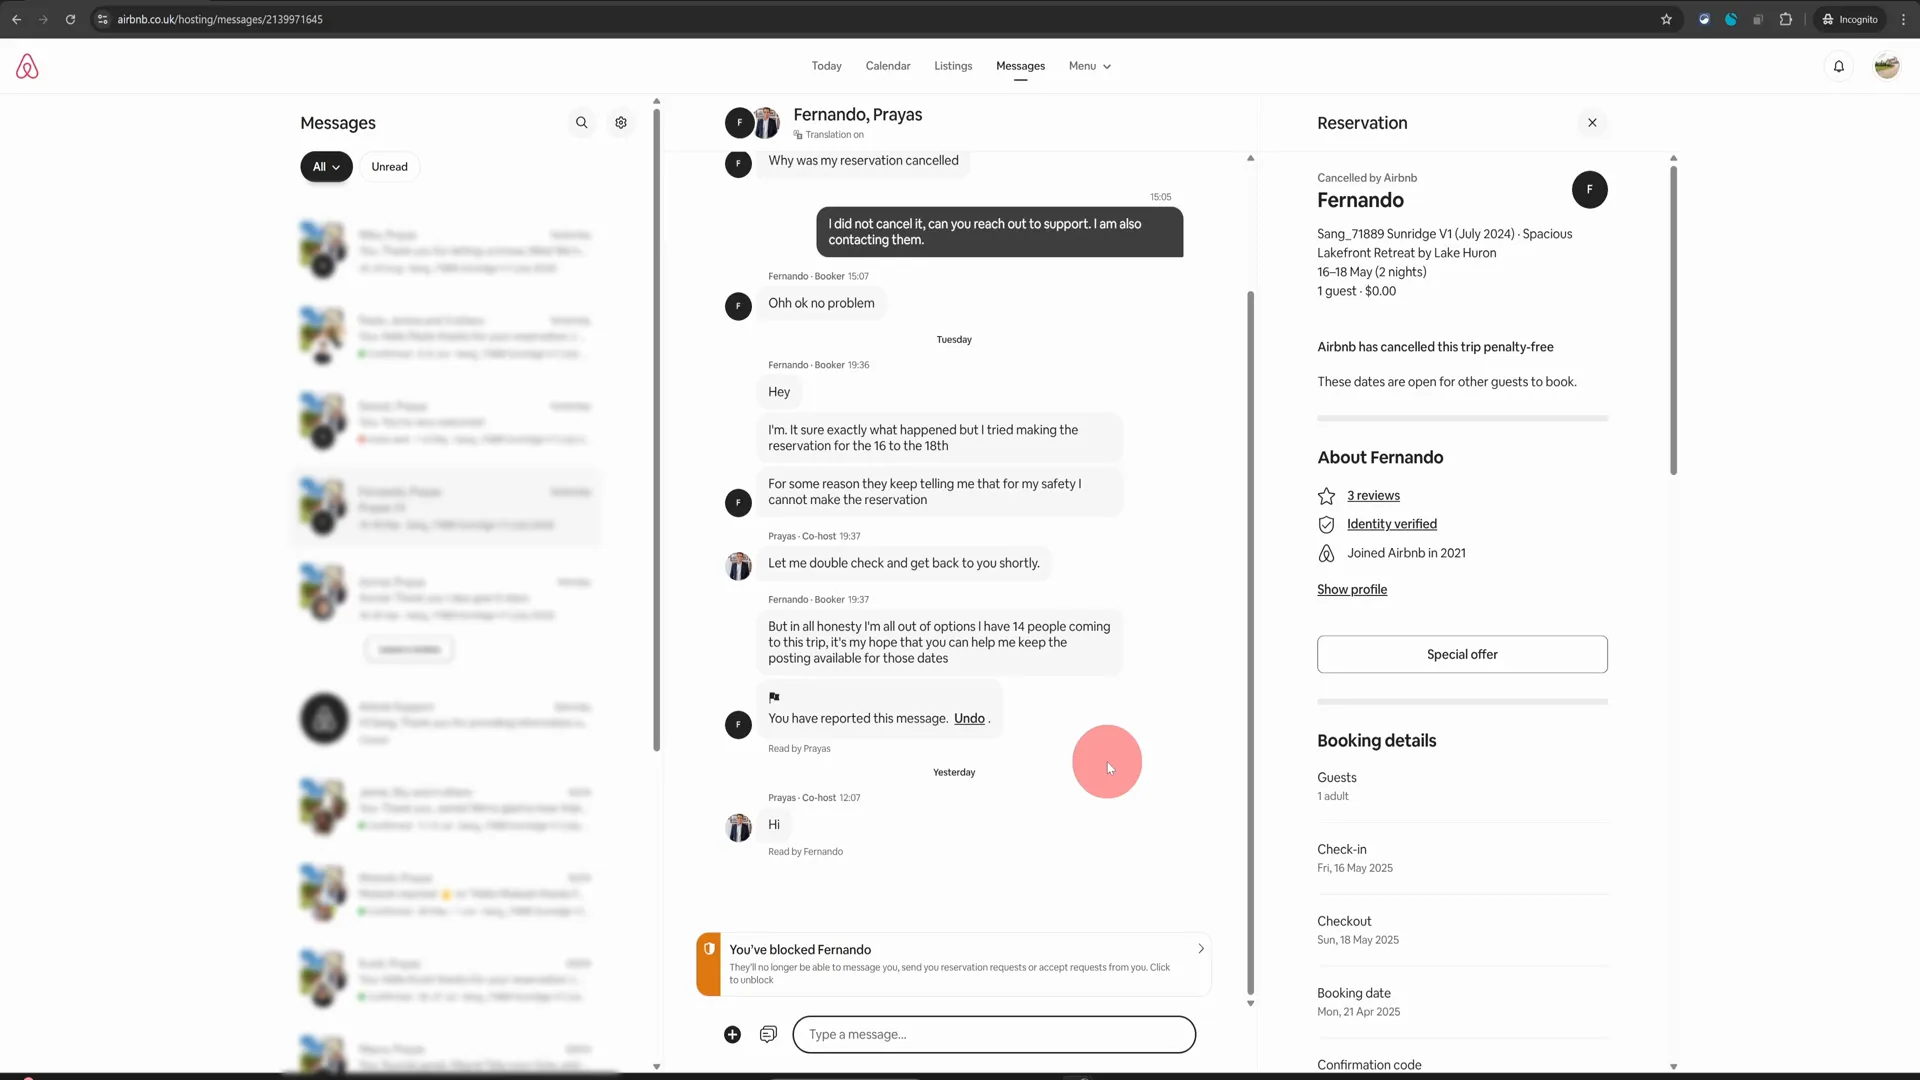
Blocking someone on Airbnb, whether it’s a guest or another host, can seem daunting, but it’s quite straightforward once you know the steps. In this guide, I’ll walk you through the exact process of blocking someone, ensuring your experience on the platform remains safe and enjoyable. Let’s dive into these Airbnb hosting tips! Table of Contents Step 1: Access the Message Thread Step 2: Report the Message Step 3: Choose Your Reason Step 4: Indicate Where Contact Info Was Shared Step 5: Submit the Report Step 6: Block the Person Step 7: Confirmation of Block Step 8: Unblocking if Necessary Conclusion FAQ Further Resources Step 1: Access the Message Thread The first thing you need to do is navigate to the message thread with the person you want to block. This is where all your communication with them is recorded. If you’re using a computer, simply click on the conversation. On mobile, hold your thumb on the message to bring up the options. Step 2: Report the Message Once you’re in the message thread, look for three dots or a flag icon. Click on this, and you will see a menu. From here, select “Report this message.” This option is crucial for documenting any issues you’ve had with the person. Step 3: Choose Your Reason After reporting the message, you’ll be prompted to choose a reason. In many cases, you might want to select “They asked me to communicate outside Airbnb.” This is a common reason for blocking someone, as it violates Airbnb’s policies. Step 4: Indicate Where Contact Info Was Shared Next, you’ll need to indicate where the contact information was shared. You can simply say “Airbnb message.” This step may feel redundant, but it’s necessary for the reporting process. Step 5: Submit the Report After filling out the necessary information, click on “Submit.” This action gets your report into the system, although Airbnb doesn’t typically investigate these matters deeply. They focus more on ensuring users feel safe on the platform. Step 6: Block the Person Once your report is submitted, a popup will appear, giving you the option to block the person. Click on “Block this person” and then confirm by clicking the block button. This action will prevent them from messaging you or sending reservation requests. Step 7: Confirmation of Block After completing the blocking process, you’ll receive a confirmation message stating that you have successfully blocked the person. They won’t be able to contact you anymore, which can provide peace of mind. Step 8: Unblocking if Necessary Should you ever decide to unblock someone, it’s just as easy. Simply revisit the message thread, and follow the prompts to unblock them. This flexibility is helpful, especially if situations change. Conclusion Blocking someone on Airbnb is a simple process that can enhance your hosting experience. Whether it’s to maintain safety or simply to avoid unwanted interactions, knowing how to do it effectively is an essential skill for every host. I hope these Airbnb hosting tips have been useful to you! FAQ Can I block multiple users at once? No, you need to block each user individually through their message thread. Will the blocked user know they’ve been blocked? They won’t receive a notification, but they will notice they can no longer message you or send requests. What if I block someone by mistake? You can easily unblock them by following the same steps and choosing to unblock instead. Are there any consequences for blocking someone? Blocking someone does not have any repercussions on your account but ensures your safety and comfort while using the platform. Further Resources If you’re looking to enhance your hosting skills further, consider checking out my free No-Nonsense Airbnb Webinar. It offers valuable insights and tips that can help you succeed as a host.
Airbnb Hosting Tips: How to Mention Pets on Your Listing
Are you a host with furry friends? If so, it’s crucial to let potential guests know about any pets living at your property. This not only sets the right expectations but also ensures a smooth experience for everyone involved. In this guide, we’ll walk you through the steps to update your Airbnb listing to mention pets, all in just a few clicks. Table of Contents Step 1: Log Into Your Airbnb Account Step 2: Switch to Hosting Dashboard Step 3: Navigate to Listings Step 4: Open Your Listing Editor Step 5: Scroll to Guest Safety Section Step 6: Access Property Info Step 7: Indicate Pets at Your Property Step 8: Add Details About Your Pet Step 9: Save Your Changes Step 10: Review Your Listing Why Mentioning Pets is Important Frequently Asked Questions Step 1: Log Into Your Airbnb Account First things first, you need to log into your Airbnb account from a computer. It’s easier to make these updates on a desktop or laptop rather than using the mobile app, which isn’t suited for this type of task. Step 2: Switch to Hosting Dashboard Once logged in, look for the “Switch to Hosting” option located at the top right corner of the page. This will take you to your hosting dashboard where you can manage your listings effectively. Step 3: Navigate to Listings In your hosting dashboard, find the “Listings” option in the top menu. Click on this to open your listings, which will allow you to make necessary edits. Step 4: Open Your Listing Editor Now, click on your listing image to open the listing editor. This is where you’ll make all the updates regarding your property. Step 5: Scroll to Guest Safety Section After opening the listing editor, scroll down until you find the “Guest Safety” section on the left side. Click on it to access more options. Step 6: Access Property Info In the menu that appears on the right, locate the last option titled “Property Info.” Click on this to proceed. Step 7: Indicate Pets at Your Property Within the Property Info section, you’ll see an option that asks, “Pets live at this property?” You need to mark this as “Yes” if you have a dog, cat, or any other kind of pet residing there. Step 8: Add Details About Your Pet Once you select “Yes,” an “Add Details” section will pop up. Click on it and type in exactly what kind of pet you have and any other relevant details you think should be mentioned. This could include your pet’s size, breed, or any specific behaviour traits that guests should be aware of. Step 9: Save Your Changes After you’ve added all the necessary details, click on “Continue” and then “Save.” This ensures that your listing is updated and that guests will see the pet information before they make a reservation. Step 10: Review Your Listing Finally, take a moment to review your listing to ensure all the details are correct. Having clear and accurate information about pets will help you avoid any surprises for your guests and enhance their experience. Why Mentioning Pets is Important By mentioning pets in your listing, you set clear expectations. Guests who may have allergies or aversions to animals can make informed decisions. This also minimizes the chances of conflicts during their stay, leading to better reviews and repeat bookings. Additionally, pet-friendly listings often attract more guests, as many travelers prefer accommodations that welcome their furry companions. So, being transparent about your pet policy can be a win-win for both you and your guests. Frequently Asked Questions 1. Can I charge a pet fee? Yes, you can charge a pet fee or a pet deposit. Just be sure to clearly communicate this in your listing to avoid any misunderstandings. 2. What if my pet causes damage? It’s advisable to set clear rules regarding pet behaviour and potential damages. You can use the pet deposit to cover any damages that may occur during a guest’s stay. 3. Are there specific breeds I should avoid allowing? It’s entirely up to you as a host to define your pet policy, including any breed restrictions. Just be sure to include these details in your listing. 4. What if a guest doesn’t follow the pet policy? Make sure to document any violations and address them promptly. You can use the Airbnb Resolution Center for any disputes related to damages or policy violations. 5. How can I make my property more pet-friendly? Consider adding pet-friendly amenities such as food bowls, pet beds, and a secure outdoor space. This can enhance the experience for both pets and their owners. In conclusion, updating your Airbnb listing to mention pets is a straightforward process that can significantly enhance your hosting experience. By following these steps, you can ensure that both you and your guests are on the same page regarding pets. For more expert guidance on hosting, check out this resource to elevate your Airbnb hosting game!
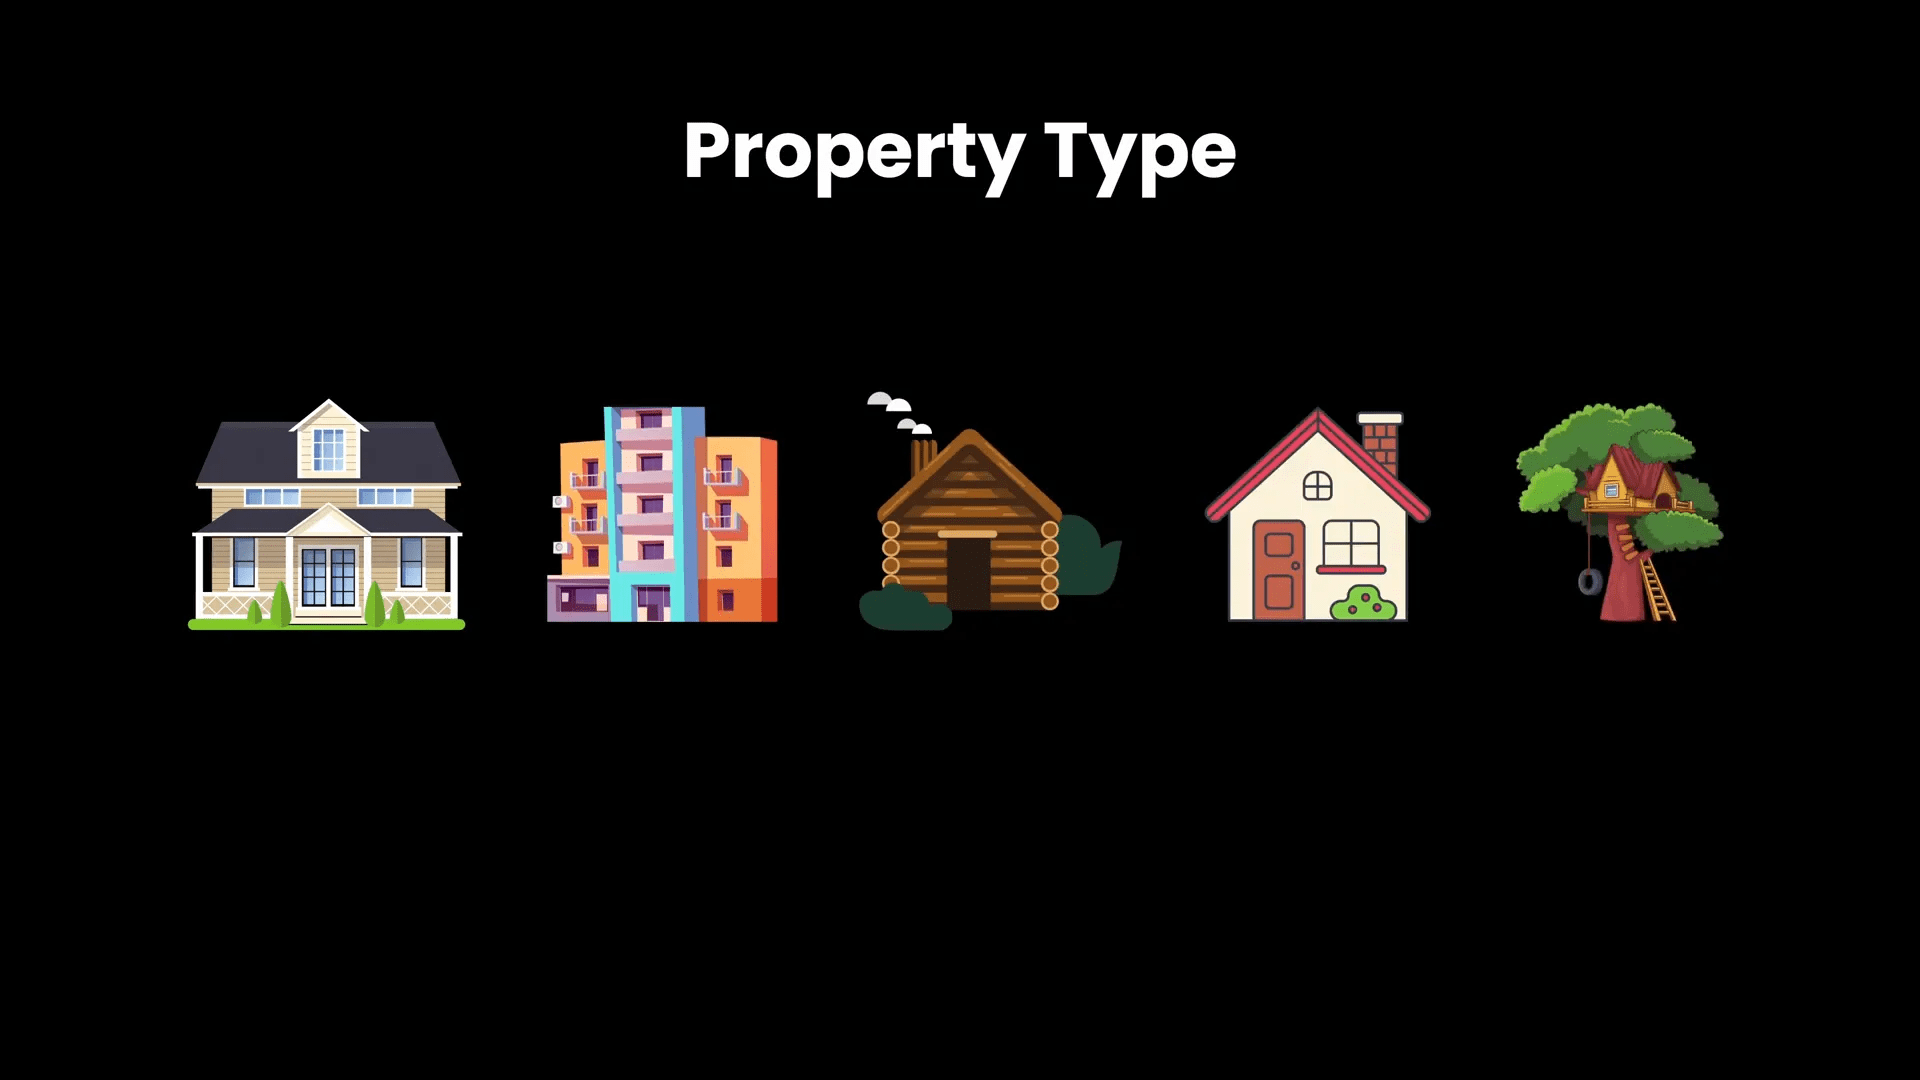
Airbnb Hosting Tips: Your Complete Guide to Listing Your Home on Airbnb in 2025
Ready to dive into the world of Airbnb hosting? This guide is your ultimate companion to listing your home on Airbnb, even if you’re starting from scratch. Whether you have a house, flat, cabin, or even a unique space like a treehouse, you can start your journey as a host today. Let’s explore the essential steps to create a successful Airbnb listing and unlock your property’s potential! Table of Contents Step 1: Understand What You Can List on Airbnb Step 2: Gather Your Essentials Step 3: Create Your Listing Step 4: Add Photos Step 5: Write a Compelling Description Step 6: Set Your Pricing Step 7: Establish House Rules Step 8: Final Review and Publish Step 9: Post-Launch Strategies FAQ Step 1: Understand What You Can List on Airbnb First things first, let’s clarify the types of properties you can list. Airbnb is incredibly flexible, allowing you to list: Houses Flats Cabins Tiny houses Treehouses Shared spaces, like a room in your home As long as you have access to the property and can let guests in, you’re good to go! Just remember, there must be a bathroom accessible to guests, and the property should be furnished with essentials like bed linen and towels. Step 2: Gather Your Essentials Now that you know what you can list, let’s talk about what you need to get started: Good quality photos of each space your guests can access. A computer for the listing process, as it’s easier than using the mobile app. ID proof, such as a driving license or passport. A working phone number for identity verification. Keep in mind that listing on Airbnb doesn’t mean guests can book your property right away. You have full control to manage bookings through your calendar settings. Step 3: Create Your Listing Let’s get into the nitty-gritty of creating your listing. Click on the referral link in the description to start the process. Here’s how to navigate through it: Click on the “Create your listing” button. Log in or create an account. Agree to the terms and continue. Choose your property type and specify whether it’s an entire place or a shared room. Enter your property address and confirm the location on the map. Specify how many guests can stay, and the number of bedrooms, beds, and bathrooms. It’s essential to accurately reflect your property details here, as this information sets guest expectations. Step 4: Add Photos Photos are crucial in attracting guests. Here’s what to keep in mind: Use your smartphone for high-quality images. Include at least two pictures of each space from different angles. Capture the exterior of your property and the surrounding area. Once you upload your images, Airbnb will automatically organize them, but you can rearrange them later if needed. Step 5: Write a Compelling Description Your listing description is your chance to shine. Here’s how to make it engaging: Start with a catchy title that reflects your property. Use descriptive language to paint a picture of your space. Highlight key amenities and unique features. Keep it concise and make sure to include any special touches that make your property stand out. Step 6: Set Your Pricing Pricing your property correctly is critical for attracting bookings. Here’s how to approach it: Consider your location and the amenities you offer. Use Airbnb’s pricing tools to find a competitive rate. Offer discounts for your first few bookings to gain traction. Dynamic pricing tools, like the one offered by Beyond, can help you adjust your rates based on demand. Step 7: Establish House Rules Clearly outlining your house rules helps manage guest expectations. Consider the following: Are pets allowed? Is smoking permitted? What are your check-in and check-out times? Being transparent about your rules can prevent misunderstandings and ensure a smooth hosting experience. Step 8: Final Review and Publish Before you hit publish, double-check everything: Make sure all details are accurate. Review your photos and descriptions. Ensure your house rules are clear. Once you’re satisfied, click “Publish” to make your listing live! Step 9: Post-Launch Strategies After publishing your listing, here are a few tips to maximize your success: Monitor guest inquiries and respond promptly. Check your pricing regularly to stay competitive. Consider special offers to attract more bookings. By implementing these strategies, you’ll be well on your way to becoming a successful Airbnb host! FAQ Q: How long does it take for my listing to be visible? A: After publishing, it may take up to 24 hours for your listing to undergo quality checks before it becomes visible to potential guests. Q: Can I change my listing details later? A: Yes, you can always edit your listing details, including photos, descriptions, and pricing. Q: What if I need help managing my Airbnb? A: You can consider using property management services or tools like this masterclass for guidance. Q: How do I handle guest communication? A: Use the Airbnb messaging system to communicate with guests before, during, and after their stay. This keeps everything organized and secure. Q: What are some common pitfalls for new hosts? A: Some common mistakes include underpricing, neglecting to set house rules, and failing to respond to guest inquiries promptly. With these Airbnb hosting tips, you’re now equipped to list your home successfully. Happy hosting!